Shop

27.12.15

3. ESSENTIAL WRAP SHIRT cutting the fronts

By this stage you're sewing room, in my case kitchen, will be covered in threads and fabric bits but we've almost finished.  I've reserved the biggest pair of jeans for cutting the fronts.  I also selected a straight leg style so there's less shaping toward the bottom of the leg.

One thing I've noticed about these jeans as I've taken them apart, expensive brand difficult, cheap brand easy...you get what you pay for!

1. Unpick the inseam, crotch seam and take off the back pockets.  Press the outside leg seam flat and then position your front pattern so that the straight grain of the pattern is aligned as best you can with the straight grain in the denim underneath.


2.  Once you've cut out the front flip the cut piece over and matching the position on the other leg cut out an exact mirrored pair.


3. So now you have all the pieces it's time to construct the shirt. Short version...darts, front tape, shoulder, sleeve, side, underarm, hem and ties.

The original plan was to make the ties from the second waistband but I've turned it into a belt instead by taking off the contrast top stitching and then stitching the edges together with matching thread.  A belt loop was then unpicked and inserted into the center back of the jacket to hold it in place.


2 pairs of old jeans from the op shop = 1 cool new jacket.


20.12.15

2. ESSENTIAL WRAP SHIRT cutting the back

So your sleeves are cut and ready, now it's time to cut out the back.  When unpicking the jeans don't be tempted to grab the scissors and cut them apart.  There is so much fabric inside the seams and you may need it.  

1. Still working with the first pair unpick the waistband.  You need a piece that's wide enough to fit across the back at the waist.  Press flat with lots of steam.


2. The upper part of the back is cut from the upper back of the jeans.  I've unpicked and taken off the pockets.  Place the pattern onto the jean back leaving extra fabric above the fold for a center back seam.  Importantly the center back fold and the straight grain on the denim should be aligned.  The dotted line indicates the shape of the denim underneath, we'll get to that later. Go ahead and cut it out, DON'T FORGET to add seam allowance above the fold.


3. Now flip your cut piece and using the opposite jean back, cut a mirrored pair.


5. With right sides together stitch the center back seam.  Neaten both edges and press the seam open.  


6. Place the waistband section you prepared earlier across the back at the waist.


Pin and then stitch along the upper edge following one of the fade lines.


7. As you can see I still have a large section of fabric missing from the lower back, time to fill this in.  Unpick the remaining left and right jean fronts and press flat.


8. You need to find enough fabric to cut the lower back from what you have left, you can see now why it's best to buy bigger sizes.  In my case I also have to work around a hole and a patch so keep this in mind as well.  Join the two fronts together at the side seams making sure the grain lines are parallel.


9. With the excess fabric from the bottom part tucked underneath, place the upper back on top of the lower section so that the center back seams are aligned and using the pattern cut out the lower back.


10. Once you've cut one side move the upper back out of the way and cut the other side to match.  You'll notice I've left lots of excess fabric.


11. Using the pattern to position the lower back correctly pin the lower back underneath the waistband and then using one of the fade lines as a guide top stitch in place.


12. Neaten the edges of the upper and lower back cutting away the excess fabric


13. Neaten the side seams cutting away the excess fabric from the waistband.  Your back is now complete.


Now it's time to cut the fronts and the ties.

13.12.15

1. ESSENTIAL WRAP SHIRT cutting the sleeves.

A new pattern called the ESSENTIAL WRAP SHIRT is in the works and will be released shortly.  The pattern is suitable for light to medium weight fabrics however to test a revised draft of my pattern I cut a sample out of old jeans.  Over the next couple of weeks I'm going to show you how I did it.  Lets start with the sleeves...
 
1. Off to the op shop you go.  In this case it's the Salvos on Chapel Street.  You'll need 2 to 3 pairs of jeans in a similar weight and colour; the larger the sizes the better.


2. Give them a good hot wash and then line dry in the sun if possible.


3. First decide which pair to use for the sleeves.  Unpick the hems and both outside leg seams to the waistbandUnpick the inseam as far as you need to and press flat with lots of steam. 


4. Overlap the inseams front over back and starting 9cm from the hem edge, stitch along the edge to hold the layers together.  For my sleeve I tucked under the front seam allowance following the natural fold left by the seam, while the underneath remained completely flat.


5. Place the sleeve pattern onto the jean leg positioning the sleeve cuff edge at the jeans leg hem and with the jeans inseam running up the sleeve so that it's positioned 2.5cm to the left of center (toward the back of the sleeve).  Go ahead and cut it out.

  
6. Prepare the other jean leg in exactly the same way reversing the overlap direction.  Flip the cut sleeve and place it down on the fabric right sides together so that the inseam positions match exactly.  Go ahead and cut out the other sleeve.

 
7. You now have your sleeves cut and ready to go, a mirrored pair cut from exactly the same part of the lower left and right legs.
 

 The creases and worn patches are what make denim one of my favourite fabrics and you can see now why it's so important to cut your pieces from exactly the same position, even in this mirrored pair there is still quite a lot of variation. 

In the next update I'll show you how I cut the back.

7.12.15

Recycled Denim

Fashion is one of the most highly wasteful, polluting and exploitative industries on this earth and the sad truth is that we the consumer are driving it.  Sure we've been suckered in by clever marketing, conditioned to believe that we must always have something new, that we must update constantly At the end of the day however the decision to buy lies with the individual.  I guess it's been on my mind more than usual as the Climate talks in Paris are underway.  

The challenge I set myself was to make up a new pattern I'm working on called the ESSENTIAL WRAP SHIRT completely out of recycled fabric.  Importantly the desirability of the finished garment could not be sacrificedThe adaptation below was cut from a couple of pairs of old jeans I found at The Salvos.  Over the next few weeks I'm going to show you how I did it and hopefully in the process encourage a mini Salvos stampede or at the very least a pre-Christmas donation.


The pattern for the ESSENTIAL WRAP SHIRT will be released shortly. It's shown here with another classic, THE LONG SKINNY made up in a animal print patterned mesh found at Tessuti in Melbourne.  Another wardrobe essential I've made and worn many, many times.


I like shopping for fabric at Tessuti, the range is extensive and I particularly like the way the fabrics are ranged in colour groups rather than by fabric type, very restful for the eye.  A large proportion of the stock is sourced from manufactures selling off excess from their production runs, who knows where the fabric above came from but it's another example of putting left overs to good use.


6.12.15

HOW TO sew a French Seam

French seams look beautiful both inside and out and for this reason you see them a lot on garments made from sheer fabrics.  The project below is in an unusual colour so I've opted for French seams to avoid having to buy lots of thread for my overlocker, here's how I made them...

1.  With WRONG sides together stitch your seam.  It should be half the width of the allowed seam allowance given on the pattern.  For this example my total seam allowance is 2cm so the initial stitching line below is 1cm from the edge.


2. Trim away half the seam allowance, in this case 5mm.


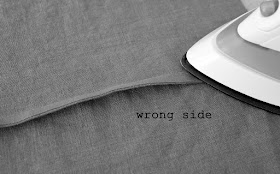
3. Press the trimmed seam to one side.   
  

4. Bring the right sides together and form a fold along the stitching line, press.


5. With RIGHT sides together stitch your seam.  The seam allowance should be half the distance allowed by you pattern, in this case 1cm.


6. Press the seam allowance to one side and you're all done.


On the right side you have what looks like a normal seam and on the wrong side the raw edges are completely encased.


30.11.15

Summer


Summer is just around the corner, only one more sleep!


22.11.15

Ode to Alber

I have a mad fashion crush on the utterly delightful Mr. Alber Elbaz.  To hear that he'd been dismissed from Lanvin after so long seemed like an April fool joke gone terribly wrong. 

Such a high profile...error of judgement, was always going to receive a lot of attention and one of the photos I came across in the aftermath was this one.  The skirt, my current garment obsession, is both floaty and feminine, the length perfect and the jewel like colour so very Lanvin.


My 3D ode to Mr. Elbaz was cut from a washed linen in a sort of dirty apple green found at Tessuti in Melbourne.   It's shown with an adaptation of the PRETTY BLOUSE in the 1933 Liberty print classic, Betsy.  The frill, mock placket and vintage buttons added to further enhance the retro feel.


The PRETTY BLOUSE sewing pattern is available from my Etsy shop in Australian sizes 6-14, a size conversion chart can be found right here.  The skirt is just two gigantic rectangles gathered into a narrow waistband, I'm quite sure however that the Lanvin original is anything but.